You can cure a hundred pounds of live rock
in twenty gallons of water if you change
the water every day or more.
You can cure a hundred pounds of live rock
in a thousand gallons of water
without ever having to change the water.
The most common mistake made in curing live
rock is to try to "save" $10 or $20 on
salt mix and let the curing rock kill itself
with ammonia by not changing the
water often enough.
We're big fans of Rubbermaid-type tubs and
trash cans. Garages and or basements are handy
if you're happily married and want to stay that
way. During summer, outside is not out of the
question with a good safely-used extension cord
... most of the stuff we use is waterproof.
Once you've ordered your rock, it's time to get
the water ready in the bucket, can, vat, tub,
or vessel of choice (or, in your tank, if it's
a new set-up.)
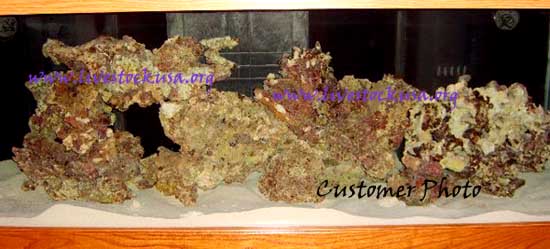
Be SURE to scroll down at the end
of the article and look at Ray's tank, where he
cured his Tonga live rock, with a note from him
about the process. Thanks again Ray !!

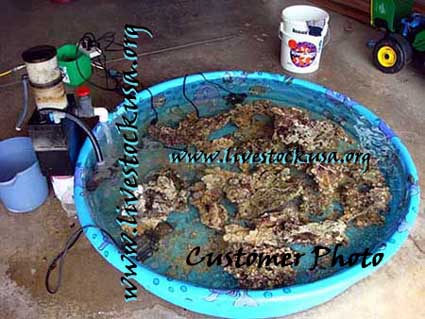
One of our customers shared his "vessel of choice"
with us, which is a great curing set-up.
Thanks to Brett of Marlette, MI for sharing
one of his photos with everyone!
The kiddie pool works great as Brett shows above.
Big tubs are good too, but get sturdy heavy duty ones.
I might use a 35-gal. tub for 40-65 lbs. of rock and
have a 12-gal. tub for rinsing and washing.
Having room for more water gives you a buffer
against ammonia burn, but you still have to change it.
Salinity and temperature are the two things that
matter at this point, although, don't sweat being
"spot-on" any given point. I like
curing lightly, by that I mean "lowish"
salinity, and temperatures. Your water should be
somewhere around 1.020-1.021 specific gravity (s.g.),
maybe 1.022, and the low '70's for temps, if you can do
it without a chiller, but don't worry if it stays warmer.
I prefer 72-75° F. — by being cooler, daytime
heating doesn't overheat the water, and oxygen levels
are higher, which speeds curing.
The lower salinity (besides the lower temperature)
will help the rock cure faster. It will not
negatively affect the rock to have it at
lower salinity and cooler temps the first
week or two. After the second week, you
can raise the temperature or salinity to
levels near where you will be keeping it
in the tank.
Note these are not suggested parameters for running
a tank, but for curing the rock most quickly.
Warmer and saltier will work, but usually slightly
more slowly. 1.022-26 s.g. is fine, as is
75° F. It will not cause a problem to go
higher than that, it will just cure more slowly at
80 degrees. Other things, such as how often you change
some water will be more important in determining
the outcome of your curing.
When the rock comes in, you should inspect it.
If very encrusted with soft spongy material
you might use a putty knife, or screwdriver,
but if not obviously spongy, preferably a
rubber-gloved finger to search for soft spots.
Sponges are often disguised on the surface and
can be essentially invisible. You can only tell
if it's not rock by pushing on it. Using bare
fingers, expect to find things like hydrozoans
or bryzoans with glass needle daggers of pain
and names like fire this and fire that.
Chip any soft spongy parts away. I like to
use fish cleaning gloves for handling live rock.
Sometimes there may be soft algaes, or many
animals, such as anemones, but you should recognize
non-sponge things. Sponges die in the air, so
forget them ... they will regenerate from the
smallest trace of spores left anyway.
IF they are there, getting rid of the sponges will
take a week or more off of your cure time ... they'll
die and foul your curing worse than anything, so get
rid of them first while washing your rock from the get-go.
Many places now are finally pre-cleaning them
off the rock, and often if there is a place on
your rock with "nothing," it is where
they took sponge or somesuch off. But check for them.
Most bare patches on your rock was where they
had to remove something in order to comply with
Fish & Wildlife regulations. But, the spores
of the roots are in the rock, and if you keep it
clean enough while curing, it will likely grow back.
I had encrusting Porites grow out of live rock a year
after curing, which hit 8.0 ammonia (pegged) because
a dingbat (NOT ME!) never changed the water while curing!
So it is pretty hard to mess up, but you can
help it on the way with a little good husbandry.
Now, after checking and, if need be, cleaning each piece,
shake it out as you do so repeatedly, put it in the
tank or tub. Carefully get all the grime and grunge
and rubble you can out of the bottom of the box, watching
out for bristle worms and mantis shrimp ... toss them out,
or confine them if you want them and are
a glutton for punishment. They are virtually
unheard of from our customers, live. But you
may see them in the bottom of the box DOA.
The two to three day trip from the island to
you usually does them in, if present.
This gooey, grungy, mucky, ugly stuff in the bottom
of the box is the most valuable pound or two
you get! It should be 20 bucks a pound at least.
It is the most bioactive stuff you'll ever hold
and it's ready to have a bioactive explosion in your
tank ... there is no better seed. Put this
in your tank as if were gold. Some people
beat the daylights out of it in a bag
(use about four plastic "fish bags" and a
mallet ... uh, er, so I heard) to make sand
out of it before they put it in. Good if you
had a bad day ... or want sand. It will NOT hurt
the bioactive properties of the PHG
(precious holy goop).
The other best things on your rock, you can't see.
Those are the seeds and spores of everything
that lives in the ocean ... no telling what ...
maybe corals, such as acroporas and leathers,
or mushrooms, clams, and blue sponge. I've
had reports of everything including purple
and blue zoas! I've seen it all grow out of live
rock three to six months and even a year after I got
it.
The sad truth is that most Pacific live rock
is held a couple weeks or more out of the water, often
on the floor of a warehouse, before it leaves L.A.
Then it goes to the store or distrubutor, so
the time involved kills most of the good stuff
on the rock that might have been there.
Fresh rock that hasn't sat around for a couple of weeks
or more makes all the difference down the road.
Though purple coralline may come back after a
couple weeks out of the water, little else does.
Now that everything is in the tank or tub, there
are two major new concerns: circulation and
ammonia removal. A couple of strong powerheads
should move the water around enough. Some kind of
skimmer should be hooked up to help pull out
excess proteins, of which there will be plenty.
Otherwise prepare water for every other day (or more)
water changes to keep the ammonia from getting too high.
Five or ten gallons a day or every other day at least
is not too much to be changing. Twenty gallons if
it stinks, is yellow, or your skimmer cup
overflows too often. If you are not skimming,
change more water ... the solution to pollution is
dilution.
I often use Bak-Pak skimmers for this with great
success, but any skimmer will do. I'll often throw
a carbon filter of some sort on for this too.
Like in a Hang-on-Tank Magnum which is handy to have.
But just for curing. I don't run carbon in
the tank. In a couple or a few days, you might
need to rewash the rock and recheck it for areas
of die-off that need to be removed.
Flip the master switch to shut off the juice
(I keep all the electrical equipment used on
one multi-plug strip) ... plugged into a GFI plug.
That way, I can flip one switch and everything
goes off at once, so I don't have to remember
if I unplugged the heater and siphon about 5-10 gallons
of water into the "sub-tub" - the smaller
12-gal. tub.
Siphon up to half or more of the water out of the
tank or tub the rock has been in, and toss it,
replacing it with warmed (if need be) new water.
I make mine in 5-gal. buckets or a small
20-gal. trash can, to have it ready in
advance, heated, airstone aerated, and all.
So now the rock has been cleaned and recleaned,
and you probably have two or three days before
you should change more water. You should be
testing for ammonia and if it's spiking high,
make a water change. Don't skimp on water now!
THE SOLUTION TO POLLUTION IS DILUTION.
Of course, the whole time the protein skimmer
has been going nuts and you can't believe how
often it's full and needs dumping. You may
want to hook up a drain hose to the cup, airline
tubing may work, or some 1/4" tubing.
I think it's a waste to make tests as often
as some indicate at first (daily), because you don't
need to be a marine biologist to tell it's bad!
Most folks without a degree would agree, it's bad!
Unless you like watching the colors on the charts,
bars, in the tubes and such.
After a week, test the water every two or three days as
the ammonia level drops. Somewhere between two and
three weeks, the skimmer will stop wheezin',
and the ammonia will drop to zero. The main spike
(and smell) is in about 10 days or so.
We have many customers report that it cures in two
weeks to three, because it is A) so fresh, and
B) they kept changing water and skimming heavily.
After the first week, as things begin to calm down,
you might see the first signs of life on your rock,
but it usually takes two weeks. Inspect it regularly
during the second week and beyond, particularly
with a flashlight at night to see what you can't
in the daytime. This is the best way to find
any unwanted hitch-hikers, though they are rare.
When your ammonia goes down to zero, you've done it!
There are now more ammonia-eating bacteria than ammonia
being created. Now you can grow a bacteria farm
in order to support the animals you want!
It's the bacteria farm that does it, don't forget!
Your live rock is cured, and it is time to move it
to the tank if you did it in tubs elsewhere.
While I would be careful to not move the curing
water to your tank, I would be equally careful to
get every bit of sand, rubble, grunge, etc., of
the bottom of the curing vessel and put in in my
tank or sump. Who knows what might be there?